Saturday, February 28, 2009

Brick stitch pattern #9


This is the pattern from the outfit one of the angels is wearing from the same embroidery as Pattern #8. When I did not have such a good image of this I tried to recreate it as can be seen with the scissors case here. As you can see I was close but not perfect when I made the scissors case. As is also with pattern #8, this pattern's stitches are all of equal length, over 4 threads or 3 holes depending on how you count on the fabric.

Friday, February 27, 2009

Brick stitch pattern #8


Here is pattern #8 as per a request from Taschen. (If you use it I'd love to see a picture!) It is from one of the columns flanking an angel from the embroidery pictured in this post. The entire pattern is stitches of the same length (over 4 strands of linen or three holes, however you count it) so it was pretty easy to chart. The original embroidery is German and dates to 1400 and is held in Hannover, at Kestner-Museum Inv. Nr. WM XXII, 10.

Where is Pattern #7, you ask? It is not ready so I skipped it. It is going to be a HUGE pattern. I am over 800 layers in the charting so far and not finished yet. I am working on it 2-4 hours a day so hopefully I'll post it sometime next week.

Thursday, February 26, 2009

How I make brick stitch patterns


A few people asked me what program I used to make my patterns and I started to answer those questions individually but then decided that it would be a good idea make a post about my method. (The full color version of the above pattern is shown in a previous post and a photo of the object from which the pattern was charted is here)

I started out by e-mailing Master Richard Wymarc because I thought the way he made his patterns looked really beautiful (and for me it must be beautiful as well as functional). He was kind enough to send me a sample file. As it turned out he had used Adobe Photoshop, one of the few programs besides Word that I can actually use. Hooray!

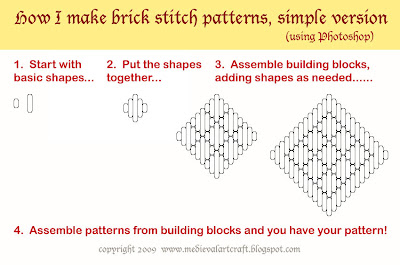
I started out by studying his template and the recreating something very similar. I finally (after a very long time) developed a basic template that is working well for both simple and complex patterns. I start with the basic shapes for various stitch lengths, then do a lot of copy and paste to get the larger building blocks. In Photoshop this creates a large number of layers. Once I have a basic building block I merge the layers, then copy and paste the various block shapes and assemble the basic pattern. I save a copy of both the basic building block and template file and a separate file with the complete pattern. I then make a third file and use the paintbucket to color in the pattern. I end up with both a colored and an uncolored version of each pattern. This gives me maximum flexibility with the pattern.

Photoshop is a bitmap program and as my boyfriend in all his computer-y wisdom says, a vector based program (such as Illustrator) is a much better choice for doing this type of work. Helene and I have discussed this and she is in agreement with my BF. Helene pointed out that Illustrator allows you to put the stitches against a grid which makes the pattern more closely resemble stitches on fabric. The grid makes the pattern easier for beginners especially to follow. I reluctantly concur. It did take a little trial and error to get the hang of the different stitch lengths but for me that was so many thousand stitches ago that I don't remember having much difficulty.

I will most likely (OK, definitely) transition to a vector based program for patterns but will still use Photoshop also. I like the clean look of the patterns without grid lines, plus I think it looks prettier on the page. That's just a personal preference.

The image above is a brief visual description of my patterning process. It makes the work of many hours look pretty simple. My goal is to provide patterns that allow those who are not interested in patterning to make these beautiful embroideries. As an additional note, I do take requests and your request will be coming up, Taschen, as soon as I have enough spare time to do it.

Wednesday, February 25, 2009

Brick stitch pattern #6


This next pattern comes from the embroidery which can be seen in this post. Thanks also to Helene for putting me in touch with Elies who sent me a detail photo of a section of this hanging. Elies took this photo on a trip to the Kestner Museum in Hanover. That's what allowed me to chart this with greater confidence of accuracy. Also of course thank you to Elies for sending me the photo!

I have seen this pattern in other embroideries of the period (14th C Germany); it is pretty basic. It makes a nice simple filler, I think. The blue and yellow colors in the original embroidery still look good, but whatever was in the centers has suffered over time so I just colored it purple.

Tuesday, February 24, 2009

Brick stitch pattern #5


Here is another brick stitch pattern, this time I do not remember what the source is, I didn't record it prominently so I could find it easily later, sorry. But it medieval and German and it does exist. It is nearly identical to the pattern I used for this purse that I made last year. That was copied from a purse on the Diu Minnezît website. I believe they had a source for theirs from an embroidery in the Halberstadt treasure but my German is nearly non-existent and I couldn't read much about it. I love strapwork and basketweave patterns and I feel happy every time I look at my purse so I had to make the pattern.

Monday, February 23, 2009

Brick stitch pattern #4


Here is the next pattern from this late 14th century German embroidered hanging at the Metropolitan Museum in New York. This is a very simple pattern and is also available in a nearly identical version on Master Richard Wymarc's site here but his version does not have color. I like color to get a better idea of the final product.

This one is so simple it does not really require a pattern but I am trying to be thorough.

A completed item using Master Wymarc's version of the pattern is here, a little needle case I made last year. The zigzag is very bold and strong colors such as the red and white in the original hanging really stand out. For all of its simplicity it is one of my favorites.

Sunday, February 22, 2009

Brick stitch pattern #1


Here is the next pattern from this late 14th century German embroidered hanging at the Metropolitan Museum in New York. It is actually the first one I finished so it is a little out of order. Actually, I patterned this one from an embroidered reliquary box that I mentioned in this post but the same motif is also in the Metropolitan hanging. Many motif were used repeatedly in different embroideries in Germany and some of those same patterns can also be found in other places such as weaving, Opus Teutonicum, and more.

Saturday, February 21, 2009

Brick stitch pattern #3


Here is the next pattern from this late 14th century German embroidered hanging at the Metropolitan Museum in New York. In the photo of the original it looks like they used blue where I have green but I had already finished the coloring when I realized this.

Friday, February 20, 2009

Brick stitch pattern #2


Now that I have a functional template for building patterns I am making much better progress than my previous one pattern per year. I think I will actually be able to accomplish my A&S 50 Challenge goal of 50 charted patterns.

I started working on patterns from this late 14th century German embroidered hanging at the Metropolitan Museum in New York. It has so many different motifs, there is lots for me to pattern. And it is a color photo so I can try to stay true to the original color scheme when I color the patterns. My colors are not exact but they are pretty close and convey the general idea. I love the way these colored brick stitch embroideries use color so boldly and sometimes inexplicably.

Eventually I plan to make nice PDF handouts like my German counted stitch hero, Master Richard Wymarc. It is thanks to his assistance that I was able to start developing my template in the first place.

I hope you like the pattern and if you use it to make something I would love to see a photo.

Brick stitch patterns are coming!

I have five completed patterns and have already scheduled them to post, one each day. Tune in for more patterns!

Thursday, February 19, 2009

Yummy berry colored silk


Look what my roommate tripped over on her way into the house today! Some little thread fairy dropped these off on my doorstep without a note or anything. Looks like my friend Renee has fired up the dyebath again. I just love the berry colors, good enough to eat. The tags say cochineal and indigo. One of the colors is a bit grayer than the others, did she mordant with iron instead of alum? I don't know, I am no dyer so I'll have to ask Renee. These are so pretty they deserve to be used in a project. Soon...

Wednesday, February 18, 2009

New brickstitch pattern


I was playing with the pattern from the reliquary box as seen in this previous post and I came up with the pattern pictured here. It seems a reasonable extrapolation from the original, especially since many patterns or parts of patterns show up in German embroideries through the centuries (13th-16th in particular). This may even be a pattern used in an embroidery that I haven't seen or don't remember seeing.

Since I do not have documentation for this specific pattern I consider it period plausible, not period.

I used the basic template to create three color schemes because color will strongly influence the finished look. Each of these color patterns is a combination used in an extant embroidery (ie. alternating colors for diagonal rows). I think it is both fun and useful to look at different arrangements without having to make an example of each.

Finally, I think I may have a basic pattern template that I like. It worked out for a simple pattern and if it works out for more complicated patterns then I will finally start working on patterning some of the motifs from various embroideries.

Wednesday, January 28, 2009

Macclesfield Alphabet Book


I haven't seen this one before. The link says "newly discovered" but not how new. I wish I could see pics of every page! It looks like the nicest modelbook I have seen. Here is the link:

http://www.creativereview.co.uk/crblog/a-designers-portfolio-16th-century-style/

Sunday, January 25, 2009

Brick Stitch Scissors Case Completed


Whew! Here it is, finished at last and just in time. This is a small case for scissors I made as a donation for the Estrella gift basket. The inspiration for the pattern can be found in the color picture from this post. Look at the outfit on the angel on the right. I used two strands of the 2-ply silk from Aurorasilk that my friend dyed; the ground is once again my favorite 24 count linen congress cloth. I couldn't figure out how I wanted it to close so I just made a loop that goes around the bottom of the case as shown to hold it closed. I kind of like it.

Now that I have this finished I have only one more project in progress and I am a bit stumped about what to do next. I want to do something in brick stitch but I'm not sure what. Not another purse, I have three now. Not another needle book either, I have too many of those!

Monday, January 19, 2009

Cleaning out my stuff

Once upon a time, I had a bad problem with shopping and delusions of free time. I bought lots and lots of stuff, I wanted to take home everything pretty. All that stuff sat around my house unused because a girl can focus on only so many interests at once. Since then I have done quite a bit of purging but there is still more left. I still probably have too many hobbies but I have let several go.

If you have an interest in Asian knotwork or lace I have some stuff for you. I will post pictures tomorrow or Wednesday and if you want it then it's yours for the price of postage. I am offering it because I couldn't bear to put it in the Goodwill bag with my unwanted clothes and household items.

Sunday, January 18, 2009

Crafty Challenge from Racaire

Racaire just posted this, I think it will be fun!

A Crafty Challenge
The first five people to respond to this post will get something made by me! My choice. For you.

This offer does have some restrictions and limitations:
- I make no guarantees that you will like what I make!
- What I create will be just for you.
- It'll be done this year.
- You have no clue what it's going to be. It may be a story. It may be poetry. I may draw or paint something. I may bake you something and mail it to you. Who knows? Not you, that's for sure!
- I reserve the right to do something extremely strange.

The catch? Oh, the catch is that you have to put this in your journal as well. We all can make stuff!


So far.....
1) Racaire
2) wortschmiedin
3)stolte/Cristina
4) Eleanor-deyeson (for whom I do not have contact info)
5)

Sunday, January 11, 2009

My first gesso wooden panel


In pursuit of making as many things for painting myself, here is my first effort at a wooden panel. It is baltic birch plywood coated with rabbit skin glue, then with a piece of linen applied with rabbit skin glue, followed by six coats of gesso which are sanded with sandpaper up to 1000 grit.

I was very intimidated by the idea of making and applying my own gesso.  As a shortcut I used the "Easy Gesso" from Natural Pigments which is mixture of chalk, marble dust and rabbit skin glue; add water and allow to set for a few hours, then use.  It really was easy, and now that I feel less intimidated I feel up to the task of making my own gesso from scratch.

A really good wooden panel will have up to 20 coats of gesso, but fewer coats can be OK.  I would have used more coats but I made five boards at the same time and did not mix up enough of the gesso.  Next time I'll make more gesso and apply more coats.  The linen I used was handkerchief weight leftovers from making a chemise, nothing special.  I couldn't find any information about what type of linen to use but I figured lighter weight was better.

The orange in the picture is the first one picked off the tree outside my bedroom.  I've been watching them grow and ripen for months now and they are finally ripe! 

Friday, January 9, 2009

Icon painting, step two


This is what the icon looks like after the second time I worked on it. The first layer of paint was applied to most of the image. The dark color will be the shadows of the finished painting. Each successive layer of paint will be lighter. Some grittiness in this layer is normal and visible in the photo. All the paint I am using is tempera, which is egg yolk, wine, water, and ground pigments.

The bole that made up the halo has now been gilded with two layers of gold leaf. Glass gold (gold leaf stacked between sheets of rouge paper) is used rather than patent gold (gold leaf adhered to a sheet of paper). I learned an easy way to transfer the gold leaf, which is generally unruly to work with. Simply place a piece of ordinary wax paper over the leaf, rub it, and the leaf will adhere to the paper. Then cut the paper into more manageable small pieces, making sure that every piece includes a section of the wax paper without gold (this makes the small pieces easy to handle). Voila! Now the gold leaf is easy to transfer!

I also applied another coat of bole to the sides of the piece. In order for the gold to look smooth and shiny the bole must be as smooth as possible. The bole is sanded with successively fine grit sandpaper, finishing at 1000 grit, then burnished. When I started sanding the bole on the sides I discovered I had applied it too thinly and I was sanding down to the gesso. Next time I will have the bole ready for gilding.

Tuesday, December 16, 2008

My embroidery thread box


A few days ago Taschen asked on his blog about what type of thread to use to achieve a period look (He is working on medieval German reproductions).  There is some information out there about using spun silk vs filament silk, but I wanted to see a side by side comparison.  So here is a little sampler of the threads currently in my embroidery box on 28 count linen.  I included cotton and wool threads for comparison purposes and because I had them.  I really want to try the Devere silk and now that they have a decent website I plan to order some.

What are your favorites and how do they compare?

Soie Ovale untwisted filament silk, I bought this to try it so I only have the one color.  It is nice and flat, even with the two strands I had to use to get good coverage on the linen.

Soie Alger is spun and plied silk with 7 2-ply strands twisted together.  Even when the strands are separated  the twist is evident.  It has a nice sheen and comes in lots of colors and is easier to find than Soie Ovale.  I used the same color of Soie Alger and Soie Ovale but there is a distinct difference in the look and sheen.  This is one of my favorites because the multiple strands are easy to serarate for different counts of linen, it works nicely, and is available at my local store.  A single strand is good for blackwork.

Aurorasilk is 20/2 spun silk with a loose twist.  This is my current favorite embroidery thread.  It is available dyed with natural dyes or in cones of undyed thread.  A friend of mine dyes this silk and gave me a bunch so I have limited amounts and colors.  To me it looks similar to some period embroideries.  It is nice to work with and because it is thicker I only have to use one or two strands which makes it easier to keep the thread flat.  Naturally dyed colors give a wonderful period feel.

Trebizond is a tightly twisted spun silk that I included in the sampler because I have it although I would never embroider with it.  It is very difficult to keep the twist even; it untwists or twists more tightly while working which is noticeable in the finished work.  It has a lovely sheen, comes in a nice range of colors and works well for kumihimo (that's what I use it for).

Splendor is spun silk popular with embroiderers but I personally hate it.  I've had problems with fraying, my blackwork looked fuzzy, and the 12 strands are a pain to separate.  I used most of mine in kumihimo experiments just to get rid of it.  Soie Alger is similar but much easier to work with.  Maybe someone else can give a less biased opinion.

DMC #5 Cotton Perle is included for comparison purposes.

Medici wool is a very fine wool by DMC that was discontinued this year.  It is finer than crewel wook and good for fine embroidery but even on 28 count linen I had to use two strands.  
Paternayan tapestry wool is thicker than crewel wool.  Comes in many colors but many of them do not look like naturally dyed colors.

Wednesday, December 10, 2008

Angel Icon, step one


This photo is of my newest project, icon painting.  In this beginning step the drawing for the icon has been transfered to the gessoed wood panel with carbon paper, then the primary lines (outline, facial features, major clothing folds) have been scribed into the gesso with a pointed tool.  Next the halo and edges of the panel have been painted with red bole.  What I will do next is sand and burnish the bole so it is ready for gilding.  In the photo you can see the reddish smear in the angel's hair.  That is where I accidentally dropped a glob of bole.  I will be painting over this area later and the bole will not be noticeable.

There is a church in San Francisco that hosts icon painting classes twice a month and a very nice lady, Betsy Porter, teaches them.  They are drop-in, so you can go as often as you want. Each student is given assistance and guidance on an individual basis.  The cost per session is $10 - what an amazing bargain!  The instructor gives each new student an information packet (cost $10) and has a selection of professionally prepared gessoed boards ready for starting an icon, available at cost.  There are also supplies available for students to use, including pigments, bole, tools, etc.   For further information, including step-by-step instructions for writing an icon, please look at Betsey's web site www.betsyporter.com.

I have long been fascinated by icon painting and think that it dovetails nicely with my medieval interests.  Many current icon painters follow traditions that are centuries old and based on Byzantine painting tradition.  Traditional methods are followed as well, including painting on wood panels, using tempura paints made from egg and powdered pigments, and gilding.  I am very excited about this new project and hope the skills I learn will enable me to paint more icons on my own as well as enhancing my neglected illumination work.