Saturday, February 28, 2009
Brick stitch pattern #9
This is the pattern from the outfit one of the angels is wearing from the same embroidery as Pattern #8. When I did not have such a good image of this I tried to recreate it as can be seen with the scissors case here. As you can see I was close but not perfect when I made the scissors case. As is also with pattern #8, this pattern's stitches are all of equal length, over 4 threads or 3 holes depending on how you count on the fabric.
Friday, February 27, 2009
Brick stitch pattern #8
Here is pattern #8 as per a request from Taschen. (If you use it I'd love to see a picture!) It is from one of the columns flanking an angel from the embroidery pictured in this post. The entire pattern is stitches of the same length (over 4 strands of linen or three holes, however you count it) so it was pretty easy to chart. The original embroidery is German and dates to 1400 and is held in Hannover, at Kestner-Museum Inv. Nr. WM XXII, 10.
Where is Pattern #7, you ask? It is not ready so I skipped it. It is going to be a HUGE pattern. I am over 800 layers in the charting so far and not finished yet. I am working on it 2-4 hours a day so hopefully I'll post it sometime next week.
Thursday, February 26, 2009
How I make brick stitch patterns
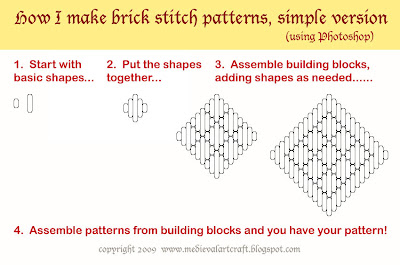
A few people asked me what program I used to make my patterns and I started to answer those questions individually but then decided that it would be a good idea make a post about my method. (The full color version of the above pattern is shown in a previous post and a photo of the object from which the pattern was charted is here)
I started out by e-mailing Master Richard Wymarc because I thought the way he made his patterns looked really beautiful (and for me it must be beautiful as well as functional). He was kind enough to send me a sample file. As it turned out he had used Adobe Photoshop, one of the few programs besides Word that I can actually use. Hooray!
I started out by studying his template and the recreating something very similar. I finally (after a very long time) developed a basic template that is working well for both simple and complex patterns. I start with the basic shapes for various stitch lengths, then do a lot of copy and paste to get the larger building blocks. In Photoshop this creates a large number of layers. Once I have a basic building block I merge the layers, then copy and paste the various block shapes and assemble the basic pattern. I save a copy of both the basic building block and template file and a separate file with the complete pattern. I then make a third file and use the paintbucket to color in the pattern. I end up with both a colored and an uncolored version of each pattern. This gives me maximum flexibility with the pattern.
Photoshop is a bitmap program and as my boyfriend in all his computer-y wisdom says, a vector based program (such as Illustrator) is a much better choice for doing this type of work. Helene and I have discussed this and she is in agreement with my BF. Helene pointed out that Illustrator allows you to put the stitches against a grid which makes the pattern more closely resemble stitches on fabric. The grid makes the pattern easier for beginners especially to follow. I reluctantly concur. It did take a little trial and error to get the hang of the different stitch lengths but for me that was so many thousand stitches ago that I don't remember having much difficulty.
I will most likely (OK, definitely) transition to a vector based program for patterns but will still use Photoshop also. I like the clean look of the patterns without grid lines, plus I think it looks prettier on the page. That's just a personal preference.
The image above is a brief visual description of my patterning process. It makes the work of many hours look pretty simple. My goal is to provide patterns that allow those who are not interested in patterning to make these beautiful embroideries. As an additional note, I do take requests and your request will be coming up, Taschen, as soon as I have enough spare time to do it.
Wednesday, February 25, 2009
Brick stitch pattern #6
This next pattern comes from the embroidery which can be seen in this post. Thanks also to Helene for putting me in touch with Elies who sent me a detail photo of a section of this hanging. Elies took this photo on a trip to the Kestner Museum in Hanover. That's what allowed me to chart this with greater confidence of accuracy. Also of course thank you to Elies for sending me the photo!
I have seen this pattern in other embroideries of the period (14th C Germany); it is pretty basic. It makes a nice simple filler, I think. The blue and yellow colors in the original embroidery still look good, but whatever was in the centers has suffered over time so I just colored it purple.
Tuesday, February 24, 2009
Brick stitch pattern #5
Here is another brick stitch pattern, this time I do not remember what the source is, I didn't record it prominently so I could find it easily later, sorry. But it medieval and German and it does exist. It is nearly identical to the pattern I used for this purse that I made last year. That was copied from a purse on the Diu Minnezît website. I believe they had a source for theirs from an embroidery in the Halberstadt treasure but my German is nearly non-existent and I couldn't read much about it. I love strapwork and basketweave patterns and I feel happy every time I look at my purse so I had to make the pattern.
Monday, February 23, 2009
Brick stitch pattern #4
Here is the next pattern from this late 14th century German embroidered hanging at the Metropolitan Museum in New York. This is a very simple pattern and is also available in a nearly identical version on Master Richard Wymarc's site here but his version does not have color. I like color to get a better idea of the final product.
This one is so simple it does not really require a pattern but I am trying to be thorough.
A completed item using Master Wymarc's version of the pattern is here, a little needle case I made last year. The zigzag is very bold and strong colors such as the red and white in the original hanging really stand out. For all of its simplicity it is one of my favorites.
Sunday, February 22, 2009
Brick stitch pattern #1
Here is the next pattern from this late 14th century German embroidered hanging at the Metropolitan Museum in New York. It is actually the first one I finished so it is a little out of order. Actually, I patterned this one from an embroidered reliquary box that I mentioned in this post but the same motif is also in the Metropolitan hanging. Many motif were used repeatedly in different embroideries in Germany and some of those same patterns can also be found in other places such as weaving, Opus Teutonicum, and more.
Saturday, February 21, 2009
Brick stitch pattern #3
Here is the next pattern from this late 14th century German embroidered hanging at the Metropolitan Museum in New York. In the photo of the original it looks like they used blue where I have green but I had already finished the coloring when I realized this.
Friday, February 20, 2009
Brick stitch pattern #2
Now that I have a functional template for building patterns I am making much better progress than my previous one pattern per year. I think I will actually be able to accomplish my A&S 50 Challenge goal of 50 charted patterns.
I started working on patterns from this late 14th century German embroidered hanging at the Metropolitan Museum in New York. It has so many different motifs, there is lots for me to pattern. And it is a color photo so I can try to stay true to the original color scheme when I color the patterns. My colors are not exact but they are pretty close and convey the general idea. I love the way these colored brick stitch embroideries use color so boldly and sometimes inexplicably.
Eventually I plan to make nice PDF handouts like my German counted stitch hero, Master Richard Wymarc. It is thanks to his assistance that I was able to start developing my template in the first place.
I hope you like the pattern and if you use it to make something I would love to see a photo.
Brick stitch patterns are coming!
I have five completed patterns and have already scheduled them to post, one each day. Tune in for more patterns!
Thursday, February 19, 2009
Yummy berry colored silk
Look what my roommate tripped over on her way into the house today! Some little thread fairy dropped these off on my doorstep without a note or anything. Looks like my friend Renee has fired up the dyebath again. I just love the berry colors, good enough to eat. The tags say cochineal and indigo. One of the colors is a bit grayer than the others, did she mordant with iron instead of alum? I don't know, I am no dyer so I'll have to ask Renee. These are so pretty they deserve to be used in a project. Soon...
Wednesday, February 18, 2009
New brickstitch pattern
I was playing with the pattern from the reliquary box as seen in this previous post and I came up with the pattern pictured here. It seems a reasonable extrapolation from the original, especially since many patterns or parts of patterns show up in German embroideries through the centuries (13th-16th in particular). This may even be a pattern used in an embroidery that I haven't seen or don't remember seeing.
Since I do not have documentation for this specific pattern I consider it period plausible, not period.
I used the basic template to create three color schemes because color will strongly influence the finished look. Each of these color patterns is a combination used in an extant embroidery (ie. alternating colors for diagonal rows). I think it is both fun and useful to look at different arrangements without having to make an example of each.
Finally, I think I may have a basic pattern template that I like. It worked out for a simple pattern and if it works out for more complicated patterns then I will finally start working on patterning some of the motifs from various embroideries.
Subscribe to:
Posts (Atom)