Showing posts with label pattern. Show all posts

Monday, March 19, 2012

Progress on the new pattern


I have been working industriously on the new pattern. As those of you with busy, demanding lives know, finding time for embroidery isn't always easy. I peck away at this a little bit at a time and I am getting much done although not as fast as I would like. I decided to finish the designs first without the background in order to post this photograph. It allows me, and hopefully those of you viewing it, to imagine different color combinations other than the yellow I chose for the background.

I am excited and looking forward to seeing this complete; it motivates me to continue. I am also trying to think ahead and decide how I am going to finish the edges.

Materials: Three strands of Soie d' Alger silk thread on 28 count linen. I'm still trying to use up my backstock of silk thread so I can change manufacturers, although I do like this thread. I just have something else in mind and wish I hadn't purchased so much of it back when I had more disposable income.

Sunday, March 11, 2012

Pattern #21


Here it is, the preliminary version of Pattern #21. Although larger than many other designs, it is a repeat. Once the first repeat is stitched, it is fairly easy to continue stitching the pattern.
The inspiration for this pattern is the tiled roof of the Hôtel-Dieu in Beaune, France (part of Burgundy). The building was built as a charitable almshouse in 1443 by Nicholas Rolin, chancellor to Duke Philip the Good of Burgundy. The current tiles were recreated from 1902-7 in the original style.


While not actually German, the pattern and colors are very similar to those of German origin. I tried to stay close to the original colors in my recreation, but it would look beautiful in a variety of color combinations.

Tuesday, March 6, 2012

New! Pattern #21 in progress


Has it really been two years since I last published a pattern? I guess so! Well, here it is: Pattern #21 in brick stitch. The pattern is based on a medieval tile roof from Burgundy as shown in the book I featured in my last post. It is technically not document-ably German in origin, but it is in the same style and it is a beautiful pattern. I tried to replicate the original colors, but I think it would look beautiful in a number of color combinations.

I am using three strands of Au Ver au Soie silk on 30 count (?I think) linen even weave. My plan is to make a purse that will have one side with this pattern and the other side with a different pattern (the planned Pattern #22), both from the same book of Burgundian roofs. There are extant examples of purses with different patterns on the two sides, although not to my knowledge are there purses with two geometric patterns; the examples I know of are pictorial. However, since the pattern based on roof tiles is purely speculative I don't believe it is too much of a stretch to make a purse with two different patterns. Plausibly it could be a purse made of two older embroideries cut down/repurposed as is demonstrated in other examples.

In this photo I show the embroidery completed in stages: the blue outline that defines the shapes, the patterns within the blue borders, and the completely finished areas of embroidery. I purposely did the embroidery this way in order to photograph it to show you the progress of my work process. Also hopefully it will stimulate your imagination for other suitable color combinations.

Look for the charted pattern at a later time when I have finished more of the embroidery. Thanks to all of you who follow my blog; I realize I have been remiss in publishing for some time and hope to be more active in the future.

Wednesday, March 3, 2010

Needle roll from Pattern #8


I'd like to teach another brick stitch class, and to that end am planning on stitching more of the patterns I made. Eventually I would like to have examples of all of them. This little pattern was easy to stitch and the needle roll is small and quick to make.

The finished size is 3 inches long and 2 1/4 inches high. The embroidery took between 5 and 6 hours, with another 2 or 3 hours to weave the cord and sew everything together. Materials were 28 count linen, and single strand Aurora Silk in undyed (white), indigo, and cochineal (purple) dyed by my friend Renee of Solar Colors and a green of a similar silk thread from the store.

As much as I liked making this, I can only have so many needle rolls. Some of the other patterns will be made into purses and other things.

Monday, November 23, 2009

Pattern #7 and some comment responses


There were some interesting comments on my last post. Here are the comments and my responses:

From Laura Kathleen:
"This pattern definitely caught my eye, as I charted the same motif while charting Russian patterns from towel ends. I wrote about it on my blog here.

I wish I knew enough about the history of the two styles to connect them, though it may just be a coincidence from working with geometric patterns."

Laura Kathleen - yes, your Russian pattern #7 and my German pattern #7 are identical, except for the stitches used. Coincidences abound...

From Elina (and I really enjoy your blog):
"What a lovely pattern, that no 7. I tried looking for the instructions on the blog, but for some odd reason couldn't find it, altough I found patterns #6 and #8. Could you please point me in the right direction?"

Elina - sorry, I haven't posted #7 yet. I'm about to correct that.

From Krista:
"That is interesting - it's like the one in Wymarc, only smaller. Very cute! Doing these in one color is fun, but be prepared for 1) getting sick of the color and 2) having people not notice the embroidery."

Krista - both true statements. As for the pattern being like Wymarc #4, it is true that they are very similar. If you look at lots and lots of these embroideries you'll see the same or similar patterns over and over again. What I like about that is that I feel like I can vary the colors or I could vary the pattern and it would still be plausible for the period. I feel like it gives me some freedom if I should ever wish to make a period plausible pattern instead of trying for reproductions. It also allows some freedom in color choices.

I was holding back on publishing Pattern #7 but I think I might as well post it. It was the most challenging to create so far; it is more complicated than many of the other patterns and the source photo was a challenge as well. I am using this pattern for the front and back panels of my reliquary box (one is shown almost finished in the photo above).

Sunday, October 11, 2009

Crafty Challenge #1 received


This is my first finished Crafty Challenge project. I was just waiting for Eleanor Deyeson to let me know she received her gift before I posted pictures (didn't want to ruin the surprise!). Here it is, a needlebook embroidered with naturally dyed silk and wool pages and lining, plus a little pocket on the inside. The pattern is my Brick Stitch Pattern #13, which I charted months ago but have been waiting to post until I actually used it to make something. It is one of my favorites! I'd love to see this in orange and green as well, maybe another time.

The ground fabric is 32 count linen embroidered with a single strand of silk.


On a side note, I think I will post some pictures of the non-medieval crafting I've been doing lately. That's where my efforts have been lately, and I feel badly about letting so much time go by in between posts.

Saturday, September 12, 2009

Brick stitch pattern #19


Since it's been a while since I posted a new pattern, here one is. The source is a hanging from Isenhagen, dated to the 14th century (Kroos, item #66). The full size of the hanging is 120 cm high by 315 cm wide. I don't know the original colors, but it appears that white stitches were on a natural linen colored background, and some of the linen was left unstitched. In the pattern on the left, I indicated the unstitched areas with a beige color. In the pattern on the right I used colors that are period appropriate but not known to have ever been used together in this pattern; I just thought it looked pretty and wanted to provide an alternative to the white. This pattern was used in the original embroidery to fill the halo of a winged bull.

Sunday, August 2, 2009

Brick stitch pattern #18


The information I have about the embroidery in this photo is "German embroidery 1300" so other than that I have no information (that I know of) about the original hanging. It looks like it once had some color but it is badly faded. I chose this pattern because I like interlocking patterns and it is yet another variation on basket weave. The original looks as if the area where this pattern was used was all the same color, probably white, but I show it in a variety of colors to provide alternatives.

Thursday, July 30, 2009

Brick stitch pattern #17


With this, my 17th pattern, I am now one third of the way towards my goal of 50 patterns. This pattern is taken from a hanging circa 1290 - mid 1300s showing scenes from the legend of St. Margaret of Antioch. Unfortunately I only have the black and white picture so colors are speculative. The light color is probably white. I had a lot of fun playing with the colors for this pattern, and since so many patterns in embroidery of this period were repeated using different color schemes you could change the colors up a bit and still have a plausibly period color scheme.

One of the disadvantages of making all these patterns is that I do not have time to make examples of all of them, although I hope to someday. This one is definitely in my top five of favorites so far so I'm sure I'll get to it eventually.

Below are some of the ways I played with color for this pattern:


Saturday, July 25, 2009

Brick stitch pattern #16


This is one of the bigger patterns, and I've always liked it. When I first started embroidering I liked it but didn't think I could ever do it. I haven't yet, but now that I made the pattern I know I could do it.

Photographs of the original can be found here. It is listed as late 13th century Spanish in origin, with woven straps terminating in turk's head knots (as often as turk's head knots show up in these types of purses I really should learn how to make them). The colors look to be light yellow, a deeper gold color, and dark blue or maybe purple? Taschen did a beautiful reproduction of the embroidery which can be seen here, it is really enviable and drool-worthy. He also published a really nice pattern. I made my own using the photograph both for the sake of completeness with my own patterns and as a technical challenge. My pattern is very slightly different, almost unnoticeably so. I'm not completely happy with it but I am tired of looking at it. Check out his pattern to compare.

In the picture I set the pattern on a tiled backround of the same pattern. The original isn't made quite this way, but imperfect photograph and wear obscure the rest of the pattern. I may attempt it another time.

Monday, June 1, 2009

Brick stitch pattern #15


This is another pattern from the embroidered hanging at the Cloisters. The original is yellow and white like my pattern but where I used green the original has an unknown color that faded to a nasty brownish color.

I want to keep knocking out patterns as the mood strikes me. At 15 patterns I am now almost 1/3 of the way towards my goal of 50 patterns. When I decided to do 50 patterns I felt like I was making an insane commitment but now it feels more manageable.

Every once in a while I make incremental progress on learning the program that will allow me to make patterns with grid lines. Until then I am doing them this way. Sometime in the future all these patterns will be lovely handouts with background information and gridlines and organized on one website. I will also have a sample item worked in every pattern.

I am stitching away on the next example but feel the need to take a break and do another technique for a while. Klosterstitch seems to be calling my name...

Monday, May 25, 2009

Brick stitch pattern #14


It's been a while since I posted but I have been busy. Here is one thing I've been doing, working on patterns. There are a couple of patterns, #12 and #13, that I haven't posted yet but I did make them. They'll be published later. On this handout I list my website, www.medievalartcraft.com, but it doesn't exist yet except as a domain name. That's coming up as well.

Friday, April 10, 2009

Brick stitch pattern #11


One of the difficulties of making patterns from low resolution pictures, especially black & white pictures, is that some of the patterning is guesswork. The colors are a rough guess as well as some of the stitches. I would love to be able to see better images of most of the known brick stitch embroideries, but I do what I can.

The image above is a comparison of two guesses as to what the pattern is in the B&W photo. I think the one on the right is correct but I am not positive. Anyway, here it is, Pattern #11 (and variation #11a).

Wednesday, March 25, 2009

Brick stitch pattern #2, different colors


The figure illustrated in the image is from the border of this hanging. I loved how the variation in color gives a striped effect and makes a simple pattern look more complicated.

I put together this picture as a starting point for developing a handout. I would like to teach brick stitch at an event and need something to give to students.

Tuesday, March 24, 2009

Brick stitch pattern #10, reversed


I flipped pattern #10 to make an "S" instead of a "Z" since both exist among extant embroideries. You could just use the original pattern and flip it in your head, but I find it easier when I have something to look at. I am still busy working on Pattern #7 so I haven't done much else lately.

Sunday, March 8, 2009

Brick stitch pattern #10


Pattern #10 comes to us from various sources, including this hanging currently in the collection of the Metropolitan Museum in New York City. The embroidered hanging dates to the late 14th century, in Germany. In this hanging the symbol looks like a letter "S". The photograph I used to make the pattern was of the above reliquary box. According to the info on the photo the box dates to the 13th century and is (questionably) from Köln. In this pattern the "S" is backwards, more of a "Z". I liked the variation of the character laying on its side.

My pattern making has slowed down considerably as I now work on stitching examples of some of the patterns. I am also still working on Pattern #7 but I think I am going to stitch it before I post the pattern.

Saturday, February 28, 2009

Brick stitch pattern #9


This is the pattern from the outfit one of the angels is wearing from the same embroidery as Pattern #8. When I did not have such a good image of this I tried to recreate it as can be seen with the scissors case here. As you can see I was close but not perfect when I made the scissors case. As is also with pattern #8, this pattern's stitches are all of equal length, over 4 threads or 3 holes depending on how you count on the fabric.

Friday, February 27, 2009

Brick stitch pattern #8


Here is pattern #8 as per a request from Taschen. (If you use it I'd love to see a picture!) It is from one of the columns flanking an angel from the embroidery pictured in this post. The entire pattern is stitches of the same length (over 4 strands of linen or three holes, however you count it) so it was pretty easy to chart. The original embroidery is German and dates to 1400 and is held in Hannover, at Kestner-Museum Inv. Nr. WM XXII, 10.

Where is Pattern #7, you ask? It is not ready so I skipped it. It is going to be a HUGE pattern. I am over 800 layers in the charting so far and not finished yet. I am working on it 2-4 hours a day so hopefully I'll post it sometime next week.

Thursday, February 26, 2009

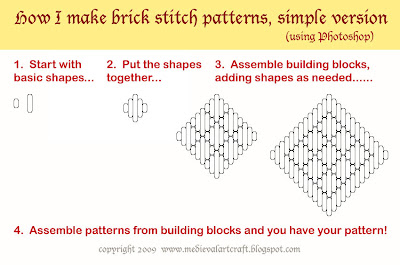
How I make brick stitch patterns


A few people asked me what program I used to make my patterns and I started to answer those questions individually but then decided that it would be a good idea make a post about my method. (The full color version of the above pattern is shown in a previous post and a photo of the object from which the pattern was charted is here)

I started out by e-mailing Master Richard Wymarc because I thought the way he made his patterns looked really beautiful (and for me it must be beautiful as well as functional). He was kind enough to send me a sample file. As it turned out he had used Adobe Photoshop, one of the few programs besides Word that I can actually use. Hooray!

I started out by studying his template and the recreating something very similar. I finally (after a very long time) developed a basic template that is working well for both simple and complex patterns. I start with the basic shapes for various stitch lengths, then do a lot of copy and paste to get the larger building blocks. In Photoshop this creates a large number of layers. Once I have a basic building block I merge the layers, then copy and paste the various block shapes and assemble the basic pattern. I save a copy of both the basic building block and template file and a separate file with the complete pattern. I then make a third file and use the paintbucket to color in the pattern. I end up with both a colored and an uncolored version of each pattern. This gives me maximum flexibility with the pattern.

Photoshop is a bitmap program and as my boyfriend in all his computer-y wisdom says, a vector based program (such as Illustrator) is a much better choice for doing this type of work. Helene and I have discussed this and she is in agreement with my BF. Helene pointed out that Illustrator allows you to put the stitches against a grid which makes the pattern more closely resemble stitches on fabric. The grid makes the pattern easier for beginners especially to follow. I reluctantly concur. It did take a little trial and error to get the hang of the different stitch lengths but for me that was so many thousand stitches ago that I don't remember having much difficulty.

I will most likely (OK, definitely) transition to a vector based program for patterns but will still use Photoshop also. I like the clean look of the patterns without grid lines, plus I think it looks prettier on the page. That's just a personal preference.

The image above is a brief visual description of my patterning process. It makes the work of many hours look pretty simple. My goal is to provide patterns that allow those who are not interested in patterning to make these beautiful embroideries. As an additional note, I do take requests and your request will be coming up, Taschen, as soon as I have enough spare time to do it.

Wednesday, February 25, 2009

Brick stitch pattern #6


This next pattern comes from the embroidery which can be seen in this post. Thanks also to Helene for putting me in touch with Elies who sent me a detail photo of a section of this hanging. Elies took this photo on a trip to the Kestner Museum in Hanover. That's what allowed me to chart this with greater confidence of accuracy. Also of course thank you to Elies for sending me the photo!

I have seen this pattern in other embroideries of the period (14th C Germany); it is pretty basic. It makes a nice simple filler, I think. The blue and yellow colors in the original embroidery still look good, but whatever was in the centers has suffered over time so I just colored it purple.